“The power of an inquiry-based approach to teaching and learning is its potential to increase intellectual engagement and foster deep understanding through the development of a hands-on, minds-on and ‘research-based disposition’ towards teaching and learning. Inquiry honours the complex, interconnected nature of knowledge construction, striving to provide opportunities for both teachers and students to collaboratively build, test and reflect on their learning”(Stephensen, Neil, Introduction to Inquiry Based Learning).
After completing my course on Adapting Innovative Technology to Education, I feel prepared to use technology and a block of time within my classroom for student-led inquiry and exploration as opposed to continuous teacher-led learning. I feel that this individual time to be creative and explore allows students to guide their own thinking. Then, students can make errors, adjust their thinking accordingly and draw conclusions that they are likely to have not made during a teacher-led lesson. This additional student control leads students to grapple with the content themselves without requiring their teacher to do it for them. Ultimately, this is likely to lead to a greater degree of content retention for the student doing the exploring.
For example, students could use a variety of technology to demonstrate understanding of a particular topic. Students could publish digital stories, record their voices on computer screens to reiterate a math concept or create a SmartBoard lesson as a project to be presented in front of the class. While the options and varieties of technology to be used in the classroom are limitless, the goal remains the same. We need to provide students with higher-level thinking tasks that are cognitively demanding. By doing so and ensuring technology is used during this exploration or for the assessment component of a particular lesson, our students are able learn more deeply through hands-on experience and exploration. Additionally, various technology that may not be specifically created for the classroom can often be easily incorporated into pre-established lesson plans as an extension or additional practice for high and/or struggling students. See my lesson plan using the Makey Makey for a kindergarten syllabication lesson here.
In addition to my use of the Makey Makey kit, it could be used in the very same manner as I suggested using it in the syllabication lesson but to teach a variety of different topics. Students could use the Makey Makey to determine the value of coins, to choose from a variety of answers (a., b., c., or d., etc.), to count and demonstration cardinality and one-to-one correspondence. With an easy-friendly, multi-purpose Maker Kit like the Makey Makey, teachers can reuse the technology repeatedly and allow students themselves to use it as a component of inquiry-based exploration and assessment already occurring in the classroom.
As long as students can demonstrate proof of their thinking and provide explanations for their work/creativity, technological assignments can be graded just as easily as traditional pencil and paper tests can be. Teachers can use Google docs/drive to easily organize and share assignments or ask students to share their assignments in small groups or for the class as a whole. Although time for hands-on exploration and technological use to better understand classroom content may not be specifically stated in the kindergarten standards, pushing students toward critical, high-level thinking certainly is. As long as I encourage students to think independently and critically while engaging in exploration, I will be meeting both the standards and the specifications of my job as a kindergarten teacher. My school demands a tremendous amount of rigor from classroom lessons and expects high expectations for all students. In fact, we are taught specifically how to ensure that students are doing the “heavy lifting”/heavy thinking. We are encouraged to view our job as facilitators and prompters of thinking not simply providers of knowledge. I fully believe that inquiry-based exploration and technology use can help me to accomplish this very task in my classroom.
EdCamp exists to provide a method used by teachers and for teachers in order to share wisdom, research, best practices and classroom experiences in a more conversational, discussion-based version of a conference. For my current graduate class, I participated in an online EdCamp experience to discuss the following topics via Google+ Hangout: literacies and technologies, innovation technology integration in the arts, the flipped classroom and critical questions about technology integration in schools. This is referred to as an “unconference” experience because teachers are learning from each other and engaging in reflective discussion as opposed to simply being on the receiving end of information from a presenter.
I definitely enjoyed my EdCamp experience and found myself to learn quite a lot from my colleagues. I enjoyed being able to listen to and watch my colleagues discuss their topic while asking written questions and/or making comments in the chat option also included on Google+ Hangout. The chat option allowed me to actively listen and engage in discussion with my colleagues without interrupting a particular person’s presentation. I also found that I gained countless ideas for technology incorporation in my classroom from this experience. I was able to make a long list of apps, websites and other technological components that can better connect with my students and improve their ability to retain required content through the use of classroom (and at-home!) technology. I feel that we, as teachers, are not always provided with an open floor to share wisdom, ideas and successes with one another and that this concept can be very useful and worthwhile. On the down side, I do feel that Google+ Hangout seems to have some trouble accommodating more than four people in a hangout at one time. Because of this, I felt that I could not fully engage in my presentation because I was concerned that I was echoing, talking over myself, and/or not able to hear someone asking a question. I feared that the video would freeze, that I would continue presenting and be totally unaware of a potential mishap. Additionally, I would have preferred to share my video that corresponded my with my “literacies and technologies” topic as the opening to my presentation. However, this video could not be shared because of a lack of available bandwidth considering the number of people present in the conversation. A summary of my EdCamp presentation, including the video, can be found here.
For my particular presentation on literacies and technologies, I made a popplet. Next time, I would chose a different visualization that can be more easily presented to a group. Although I felt my popplet is an excellent way to explore the topic and components of literacies and technologies, a popplet seems to be more easily read when one is exploring on their own. Because the material is not in a specific order in a popplet and the viewer has a choice on what to view and when, the information seemed a little bit less organized when I began to share with the group. For presentation purposes, a different visual option that orders information for the sake of presenting may have been a better choice.
EdCamp Impact
This type of unconference conversation can have a tremendous impact on teachers. Having this time to zero in on a topic and sharing knowledge and best practices with one another is an invaluable experience. As a teacher, I love to hear from other teachers who are teaching now, using these methods now and learning now about how to better reach their students. When a “right now” teacher tells me what is working for them, I am much more likely to immediately incorporate these same strategies and best practices in my classroom. Especially for teachers in my school, this type of uncoference could make a huge difference in how teachers interact and relate to one another. For example, if we approach each other, as colleagues, with the idea that each one of us is a resource and has invaluable knowledge to share, how much more likely we are to share knowledge, ask questions and participate in a dialogue even when not participating in an EdCamp experience.
Organizing an EdCamp “Unconference”
If I were to organize an EdCamp experience, I would first experiment with my own colleagues from my school face-to-face. Although this could be tricky with scheduling, it would allow for in-depth analysis of student work, display of student projects, sharing of materials, etc. that a remote video call could not provide. I would likely encourage my colleagues to choose topics that are relevant to our every day teaching specifically within our school. After determining the best way to visually and verbally present ideas and materials and providing teachers with options, I would then focus on organizing a smaller EdCamp (4-5 people) on Google+ Hangout to conserve bandwidth and allow for more options to be utilized in presentations and discussions. Conceptually, it would be best to take some kind of poll to determine what teachers are most interested in sharing, discussing and learning to ensure that teachers find their experience to be most beneficial. Logistically, I would likely take the responsibility of asking teachers to commit to sharing a topic and organizing the Google+ Hangout/call itself. In conclusion, I feel that unconferences seem to happen often in a school setting informally. However, if we are committed to sharing our best practices with one another, we can easily participate in more constructed unconferences allowing us to delve deeper into topics of interest to further develop teaching practices.
References:
Hague, Simon. “The power of collaboration”. YouTube. Retrieved from https://www.youtube.com/watch?v=y_m9nReouVY
What is Universal Design for Learning and how should it change your lesson plans?
Universal Design for Learning, or UDL, is “a framework that addresses the primary barrier to fostering expert learners within instructional environments: inflexible, “one-size-fits-all” curricula” in order to better meet diverse, student needs and abilities (CAST, 2011, pg.4). A few weeks ago, I wrote this blog post explaining how to use the Makey Makey to teach syllabication in a kindergarten classroom. This week, I have used the Guidelines of UDL to improve my lesson’s ability to better reach learners of all shapes and sizes. The edits to my original lesson can be seen in purple ink here. Although I felt I wrote and designed a worthwhile, interactive lesson plan, there are several edits that can be made to better reach varying learners according to the accommodations listed by UDL.
For starters, I originally did very well using multimedia in my lesson plan. The lesson was designed to be taught on an interactive whiteboard (visual), followed by the use of the Makey Makey kit (tactile and auditory), an assessment/paper sort (tactile/visual) and a song/video (kinesthetic, auditory). I also feel that my lesson was properly scaffolded prior to making the UDL edits and was/is socially relevant and age/ability appropriate.
UDL Changes Made
To better accommodate varying learners I added options for differentiated visual interaction by allowing students to use the Makey Makey piano site to practice their syllables on a classroom desktop computer or iPad as opposed to whole-group. This could advantage students who may have a more difficult time interacting with the Makey Makey piano site in a whole-group setting. To accommodate auditory learners in a more meaningful way, lyrics to the video/song on YouTube can be provided and sent home so that the students may practice with their families and interact with the media multiple times.
Several of my changes were centered around comprehension. I added a few components to the lesson to better background knowledge, check for understanding and establish goals and objectives more thoroughly. To better background knowledge, I addressed that the lesson I wrote is not intended to be taught as the first lesson on syllabication but that students are to be introduced to the concept prior to the use of the Makey Makey. I also added a note encouraging teachers to practice syllabication in small groups with struggling or ELL students prior to teaching this lesson. Most importantly, I thought it best to add a review of the key vocabulary term, “syllable”, before even beginning the lesson for the entire group. At the end of the activity, I decided to review the sort/assessment with the students as a whole group to better check for understanding. Lastly, to establish clear goals and objectives, I added a section of my lesson plan where the teacher is to review each objective with the students before beginning and encourage them to make individual content and behavior-based goals.
Students will also be given freedom in the way in which they display their comprehension through the sort/assessment. Changes and adaptations can be made based upon need and mastery of the material. I also made the use of my modeling and think-aloud clearer and provided more opportunities for the teacher to provide verbal (during the lesson) and written (on the sort/assessment) feedback. Although I imagined the teacher to circulate the classroom and ask self-monitoring/reflection questions, I added this component in writing during the assessment portion of the lesson. Similarly, I expected the teacher to provide positive encouragement throughout and maintain strong classroom management but did not state this directly. I have now edited it to include example of positive encouragement and ways in which to monitor student behavior through goal setting and the use of a classroom behavior system after completing the lesson. Lastly, I also stated that students can complete their assignment in small groups of four to better foster collaboration and community.
Please see the following outline of UDL Guidelines to determine how and why I made these specific changes to my lesson plan.
Reference
CAST (2011). Universal Design for Learning Guidelines version 2.0. Wakefield, MA: Author.
“Digital natives, as students are often referred to, are demanding technology-rich learning environments: new ways to engage in core curriculum content through the use and integration of technology”(Dellie & Silverman, 2012).
In an ever-changing and an ever-increasing digitally and technologically based society, it is more appropriate than ever that teachers prepare their students to be active and proficient members of the 21st century the moment they step in the classroom. This digital literacy, often referred to as “new literacy/literacies”, requires a continuous commitment from teachers to focus literacy instruction around technology use.
The following articles address the use of technology in the classroom for literacy instruction:
I created a popplet answering the key question, “How is technology changing education in literacy?” by drawing a connection between research articles and online journals, classroom tools, websites, tools and literacy apps and incorporation of technology in literacy learning.
“Technology has very much changed its meaning. It is now information, ideas, and knowledge … not just a computer. Technology is a process” (McVee, Bailey & Shanahan, 2008).
Dellie, D.A. & Silverman, M.A. (2012). Bridging the past and the future: how a community learned from and celebrated with 21st-century learners. Journal of School Public Relations, 33(2). Retrieved from http://go.galegroup.com.proxy2.cl.msu.edu/ps/retrieve.do?sgHitCountType=None&sort=RELEVANCE&inPS=true&prodId=AONE&userGroupName=msu_main&tabID=T002&searchId=R1&resultListType=RESULT_LIST&contentSegment=&searchType=AdvancedSearchForm¤tPosition=6&contentSet=GALE%7CA320266103&&docId=GALE|A320266103&docType=GALE&role=
McVee, M.B., Bailey, N.M. & Shanahan, L.E. (2008). Teachers and teacher educators learning from new literacies and new technologies. Teaching Education, 19(3). Retrieved from http://www.tandfonline.com.proxy1.cl.msu.edu/doi/full/10.1080/10476210802250216#tabModule
Mesjms. (Feb. 2014). Did you know 2014. YouTube. Retrieved from https://www.youtube.com/watch?v=XrJjfDUzD7M
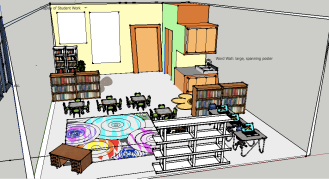
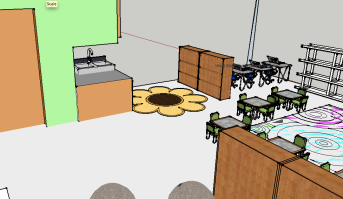
When thinking about how a classroom should look and feel based on what we know about 21st century students surrounded by 21st century technology, I chose to redesign my previous kindergarten classroom focused on the following components:
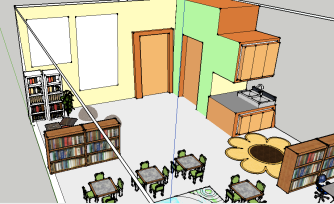
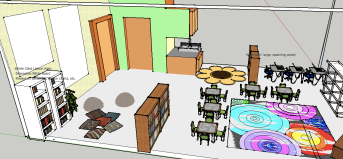
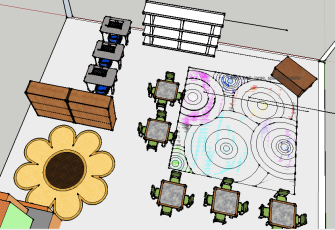
Technology: Not only will students have access to an interactive whiteboard for whole-group lessons and iPads for individual use and practice, but they will also have personal laptops. The interactive white board is located in front of the large rectangular rug. The iPads, laptops and other forms of technology are stored on the large shelving unit near my desk. Technology can be utilized in the bottom right corner of the classroom, in the Exploring Science & Technology area, but can also be used in other areas, as well. The technology will be incorporated in the classroom as motivation for student learning/participation as well as a necessary component for teaching new literacies in a 21st century classroom.
Exploration: There are multiple areas in my classroom created for learning through individual exploration and small groups. There is the cozy Reading area in front of the windows, which has comfortable bean-bag chairs, floor pillows and a large selection of books and reading and writing activities. In the Exploring Science & Technology area, chairs with wheels are incorporated for ease of use and to allow for acceptable movement and fidgeting that often accompanies learning. This area will also be used for student-led design and creating. Students can explore Math games and activities in the section of the classroom near the sink with the flower-shaped rug. Providing different areas within one classroom allows for students to daily engage in real-world activities inspired by instructional design. Not only will students be able to explore hands-on activities in the different areas of the classroom but they will be individually challenged, able to work at their own pace and will also have a choice in the activities of which they partake encouraging empowerment, confidence and self-directed learning. These components are often closely linked to student motivation which is even more closely linked to student success.
Collaboration: The classroom is separated into four main areas: Reading & Writing, Math, Exploring Science & Technology and Whole Group Learning which allow for student collaboration, participation and exploration. There are no individual desks lined up in rows but instead, there are small tables, designed for four students each, located around the edge of the Whole Group Learning rug. Developing a community in my classroom through collaboration will encourage students to feel invested in their learning and to give each task their best understanding that they are a valuable member of a team.
Aesthetics and Comfortability: Large windows are incorporated to allow maximum natural light as opposed to fluorescent, harsh lighting. A live plant is also located in the reading area. Warm and bright colors are utilized on the walls, chairs and rugs. The classroom design is intended to allow for movement, reconfiguration and exploration throughout the school day.
Student work: The entire wall behind the Reading Area is intended to allow for demonstration of student work. The students are to view this area as a museum or gallery of their best work.
But how much would it all cost? How long would it all take?
Inxpensive….
Money aside, it’s relatively simple to create various “areas” in your classroom with everyday classroom supplies and furniture you already have. Rugs can help distinguish a particular area while bookshelves can to be used as walls or barriers for separation. Painted walls and plants can also be inexpensive.
Expensive….
Adding larger windows to the classroom would be an expensive fix and would likely require a whlole-school construction redesign. My previous classroom also had tables instead of desks but they were much larger than the ones used in my redesign and could not easily be reconfigured. These new tables and chairs, however, are smaller and can be moved for various classroom activities. The Exploring Science & Technology area was a small-group work area in my previous classroom containing only a half-moon-shaped table. In my redesign, I added three large tables to support technology use and hands-on exploration as well as wheeled chairs for easy reconfiguration. I had an interactive white board in my previous classroom so that would not have to be purchased but a classroom set of laptops and iPads would cost a significant amount. Likely, grants would have to be received in order to pay for the technology incorporated in my redesign. Although this new technology is expensive, I feel it is one of the best ways to properly prepare 21st century students to live meaningfully in a 21st century world while meeting individual student learning needs and goals.
In conclusion, we must view the classroom environment as a “third teacher” that greatly influences, encourages or discourages genuine learning. “Experience design”, as this concept of the third teacher is often referred to, can be seen as a “point in time”, a “flow” and a “participation” that greatly affects the learning process (ChangSchool, 2010). We, as teachers, must approach our classroom set up and design as an environment that will foster, and not hinder, real learning.
References
ChangSchool. (Feb. 9, 2010). Tedde Ven Gelderen on experience design. YouTube. Retrieved from
OWP/P Architects, VS Furniture, & Bruce Mau Design. The third teacher. Harry N. Abrams: First Edition.
The Third Teacher (n.d.) TTT Ideas Flash Cards. Retrieved from
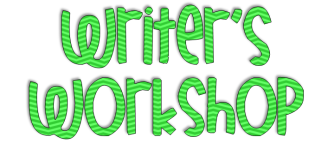
MOOCs (Massive Open Online Courses) are free online courses that allow anyone, anywhere to enroll and engage in learning from the comfort of their own home. MOOCs have opened the world of knowledge and education to reach a limitless number of people despite location, university affiliation or cost. Below is an example of a MOOC I designed (and could potentially lead) on the topic of Writer’s Workshop in the classroom.
I have designed a MOOC below entitled “Writer’s Workshop 411” to provide a better understanding of how MOOCs function.
Writer’s Workshop 411
In my Writer’s Workshop 411 course, students will master planning and preparation of the Writer’s Workshop process by creating videos, anchor charts, Wordles and lesson plans aligned to curriculum and Common Core Standards while communicating weekly with peers on current and desired practices of writing instruction, assignment critiques, the sharing of good ideas and collaborative lesson planning.
Course Topic: Implementating Daily Writing Workshop in a K-5 Classroom Setting
Are you a K-5 teacher….
looking to amp up writing instruction in your classroom?
failing to see as much success as desired in your writing instruction?
needing a better understanding of the ins-and-outs of Writer’s Workshop?
struggling to incorporate daily Writer’s Workshop?
…Then, this course is for you!
Participation in the Writer’s Workshop 411 course, will:
provide a research-based overview of the Writer’s Workshop process
teach how exactly to incorporate Writer’s Workshop daily in your classroom
provide opportunities to collaborate with peers on writing instruction and the implementation of Writer’s Workshop
teach you to use Writer’s Workshop as an instruction time specifically for individuals and small-groups
Upon completion of the 4week course, peers will be able to:
understand the value of daily Writer’s Workshop for student writing instruction and development
incorporate daily Writer’s Workshop as the main component of writing instruction
meet daily with individual and small groups of writers for remediation, re-teaching, focus groups, challenge, creation of individual goals, etc.
Week 1: What is Writer’s Workshop and what does it look like?
Pre-Assessment: Students will create a Wordle listing at least fifteen words or phrases that describe how they currently view Writer’s Workshop/writing instruction in their classroom, describing why they chose these particular words/phrases and introducing themselves to the class.
Explore/Learn: Students will watch several YouTube video explaining and demonstrating the Writer’s Workshop process and take notes comparing and contrasting their own thoughts and experiences on Writer’s Workshop with those demonstrated in the videos.
Do/Create: Create a Jing (a voice-narrated video of your computer screen) similar to the YouTube video below describing what your current classroom writing instruction looks like.
Talk: Comment on three to four colleagues Wordles & Jing videos posted on the class wiki comparing and contrasting writing instruction in various classroom.
Week 2: What is a mini-lesson and how should it be taught before Writer’s Workshop takes place?
Do/Create: Using your specific required curriculum and/or Common Core Standards, write a lesson plan using the Lucy Calkins lesson plan format. Post your lesson plan on Google docs.
Talk: Students will critique and comment on a colleague’s lesson plan via Google docs.
Week 3: How do I manage my classroom while students are engaging in independent Writer’s Workshop?
Explore/Learn: Student will use the YouTube video, the assigned reading and the listed book to record observations and notes of what the teacher is doing and how the teacher is managing the classroom during individual writing time.
Do/Create: Create anchor charts for the following procedures to use in your specific classroom with your students:
when and how students can sharpen their pencils
where paper and other writing tools are kept and how they are to be put away
how to date and label writing
what to do when you need help or are “stuck” (e.g. use the resources in the room to help you like anchor charts, dictionaries, other published works, classroom books, other students)
procedures for arranging for conferences, partner editing, publishing
Talk: Review and make comments on your colleagues’ anchor charts posted to the class wiki and make changes to yours (if desired) based on the ideas and comments of your colleagues.
Week 4: How do I manage my classroom while students are sharing their writing?
Explore/Learn: Students will record observations and compare/contrast the following video with the Lucy Calkins outline of whole-group sharing.
Do/Create: Students will create a video, in contrast to their Jing video created in Week 1, describing how they now view writing instruction and Writer’s Workshop at the completion of the course. The video will address changes to be made, strategies to implement, etc. that the student feels will better daily overall writing instruction and development.
Post-Assessment/Talk: Students will post a new Worldle after finishing the course and compare and contrast their thoughts on writing instruction and Writer’s Workshop prior to and at the completion of the course. Students will comment on the Wordles of their colleagues and post all final assignments on the class wiki.
Writer’s Workshop 411 Projects & Creations
Students will make a Jing video, two Wordle projects (one at the beginning and one at the end of the course), anchor charts to be used in their classroom for Writer’s Workshop behavior and procedures, a mini-lesson plan for Writer’s Workshop on Google Docs and a video describing their Writer’s Workshop and how it will be effectively implemented in their classroom. Writer’s Workshop 411 Peer Collaboration Focus
This course will be reliant upon peer communication, peer commentary and peer collaboration. Students will practice collaboration in a way that avoids “reinventing the wheel” and focuses more on using colleagues and fellow teachers as a resource for improved writing instruction and daily Writer’s Workshop.
Weekly Module Course Design
For each week/module, students will participate in a “Explore/Learn” portion of the class that will focus on learning new content via readings and/or YouTube videos. After exploring and learning, students will put their new knowledge into practice by completing the “Do/Create” portion of each module. Finally, students will participate in the “Talk” portion of each module allowing them to collaborate with peers, share, critique and comment on colleagues work while learning from others in the course and networking with other teachers. The course is designed this way because it allows material to be properly scaffolded by introducing new content first, practicing new content through doing and sharing once the content is learned and finally, reflecting and collaborating with colleagues on learned material. This course is also created with the components of instructional design by teaching students to incorporate a real world performance (Writer’s Workshop), stating objectives each week, followed by content, methods of practicing the content and evaluation of an assignment/content each week. TPACK, the connection of technology, pedagogy and content knowledge, is also a foundational concept incorporated in the design of this course.
References
Blossom, A. (2011). Photos 1.
Calkins, L. & Oxenhorn, A. (2003). Small moments: Personal narrative writing. New York, NY: Heinneman.
National Governors Association Center for Best Practices & Council of Chief State School Officers. (2010). Common Core State Standards. Washington, DC: Authors.
Peha, S. (2003). Teaching that makes sense: Welcome to writer’s workshop. TTMS.org. Retrieved from
Have you ever assessed your personal learning style? Do you know how it is that you learn best? Do you know how your students learn best? Have you assessed your students’ learning styles to better meet students’ needs?
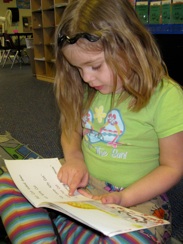
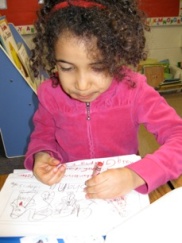
I purposely designed my Maker Kit lesson plan, explained fully in the previous blog post, to accommodate various learning styles. Using the Makey Makey to touch, hear and see syllables when determining syllabication allows learners to kinesthetically, audibly and visibly interact with the Makey Makey during the lesson. Fortunately, the lesson I designed can be used in individual, small-group or whole-group lessons while accommodating different types of learners. Two specific, current research articles support my pedagogical choices used in my Makey Makey syllabication lesson plan found here.
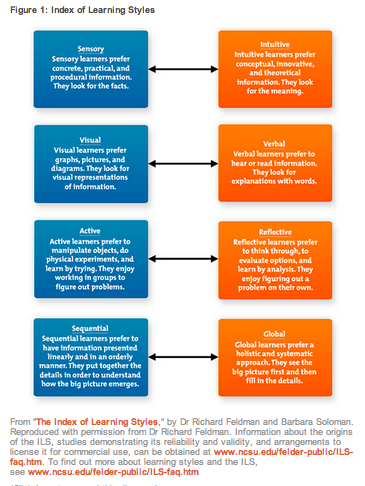
“Assessing experiential learning styles: A methodological reconstruction and validation of the Kolb Learning Style Inventory” discusses the use of specific learning inventories in order to determine particular student learning styles and how knowledge of these learning styles positively affects academic achievement. David Kolb’s original Learning Style Inventory separated learners into four categories based on their learning styles and strengths. The general idea is that determining a student’s learning style, gives the individual learner control over their learning process and allows a teacher’s role to change “from transmitter of information to organizer and facilitator of meaningful experiences oriented around students’ individual needs” (Manolis, C., Burns, D.J., Assundani, R., Chinta, R., 2013). Unfortunately, support for Kolb’s particular LSI has not had overwhelming positive feedback for its accuracy. The article addresses this issue of learning style assessment accuracy and inaccuracy but fully supports teacher knowledge of a student’s learning style and its beneficial use in the classroom stating that “educators need to know students’ learning styles such that they can adapt their teaching styles and pedagogy to maximize student learning” (Manolis, C., Burns, D.J., Assundani, R., Chinta, R., 2013). Another learning style assessment, LSQ, was developed by Honey and Mumford and although found useful, was not always determined to be accurate. The article states that these learning style assessments often address a student’s one particular learning style but fail to determine the full degree of a student’s learning style. Often, learning style assessments narrowly identify one particular style or preferred method of learning as opposed to the likely present multiple learning styles that apply to any specific learner. The second article I explored, “On the effect of learning style on scholastic achievement” supported the previous article in stating that the quality of one’s education is improved when one’s learning style is known. The article stresses the combination of instructional methods and individual learning styles as a pairing for academic achievement of all students. The researchers used Kolb’s LSI to determine the learning styles of students in college courses and also found that genders can often share similar learning styles. This particular knowledge of student learning styles can be incredibly helpful to teachers especially when pairing or grouping students for small-group instruction.
Based on the above current research, I do not feel that I need to adapt my Makey Makey lesson plan. I feel that my lesson addresses multiple types of learners when used as a whole-class activity. What I would suggest, however, is that teachers begin their year by determining learning styles as best as they can. Even though the the accuracy of such assessments, like the LSI or the LSQ, are often debated, some knowledge of a student’s learning style seems more powerful to me than no knowledge at all. Knowledge of student learning styles used in conjunction with lesson plans that cater to specific student needs and styles are likely to lead to academic achievement and ultimately, student engagement.
References
Bhatti,Rahmatullah. (2013).On the effect of learning style on scholastic
acheivement. Current Issues in Education, 16(2). Retrieved from
Repurposing I cannot tell you how often I’ve explained to family members, friends, strangers and acquaintances that, we, teachers always spend our own money on our profession. We buy classroom decor, area rugs, prize box toys and office supplies. We buy books, folders, gidgets, gadgets, this and that which we believe will make our day more functional and meet students’ needs more meaningfully. In fact, my husband and I have had a monthly teaching budget since my first teaching job. It’s sad, but very true.
Because teachers are apt to feel strained financially due to a lack of budget/stipends and a growing list of needs, thrifting can become an invaluable habit. For this particular exploration in using the Makey Makey in my classroom teaching, I chose to repurpose four glass mason jars. Originally, when headed to the thrift store, I had no good ideas for how I wanted to innovatively use the Makey Makey in my classroom. Seeing many fun, unique items, I settled on four, simple, run-of-the-mill glass jars. Why? As confident as I am that teachers often do not have the funding they need for classroom materials, I am even more confident in teacher’s ability to gather too much stuff. I chose the glass jars for this particular repurposing project knowing that the jars themselves could be continuously repurposed in my classroom even after used with the Makey Makey kit.
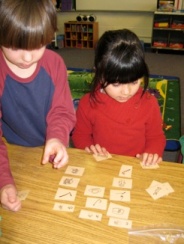
How-To: To use the MakeyMakey kit and four glass jars for a activity/assessment on syllabication, read on.
You will need:
-MakeyMakeyKit: USB cable plug, MakeyMakey board, five alligator clips
-Aluminum foil
-Four glass jars labeled or numbered for your lesson/activity
-http://makeymakey.com/piano/
Step 1:
Connect larger end of red USB cable to computer.
Step 2:
Connect smaller end of red USB cable to Makey Makey board. When done correctly, a red light will turn on.
Step 4:
Attach an alligator clip to two of the holes labeled “Earth”. The other end will be attached to you when ready to begin.
Step 5:
Wrap aluminum foil around the top edges of each glass jar. The aluminum makes the glass jars conductive so that they can interact with the Makey Makey board.
Step 6:
Attach one alligator clip to the top of each glass jar.
Step 7:
Attach the other end of each alligator clip to one of the arrows on the Makey Makey board as shown.
Step 8:
Hold onto the other end of the alligator clip attached to the “Earth” portion of the Makey Makey. (You can also make a ring or tight fitting bracelet out of foil or use a hair tie to attach the Earth clip to so that you do not have to hold it.) This completes the circuit so that when you touch the jars with your other hand, that particular piano key will sound. Make sure the various alligator clips and the glass jars are not touching each other.
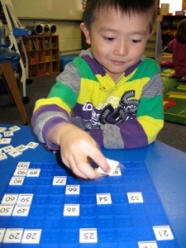
How can I use this in my classroom? I have designed this particular activity to be used in conjunction with the teaching of syllabication. When young students are learning to listen to words and break them into syllables, they are often taught to clap each syllable. However, this can be confusing when students are trying to clap the syllables of a word while counting to determine approximately the amount of syllables for which they clapped. Using the numbered glass jars and the Makey Makey, a teacher can give a student a word like, “rainbow”. The student can then repeat the word listening for the syllables, find the jar that says “2” and tap the jar two times to make two piano sounds/notes while saying the word in its separate syllables to check their answer. Not only does this activity offer a more precise, clear alternative to the clapping, but gives a student the opportunity to connect the written number to the oral number. This interdisciplinary connection combines both ELA and Math Common Core Standards for kindergarten. Additionally, using the piano with light up keys, means students throughout the room can see which particular key lights up (I suggest writing the number associated with each key on the white board) and determine whether or not they agree with the response. This method could also be used in small groups or one-on-one as a fun, interactive form of assessment.
This activity reaches auditory, kinesthetic, tactile and visual learners, meaning the majority of students are likely to be engaged and enjoying themselves while learning and practicing syllabication!
**This multi-modal blog post adds to the value of my work because I’m able to reach an audience through text, visual display/photographs and auditory explanation/video. Therefore, the blog post and the lesson plan focus on the inclusion of many different types of readers, viewers and learners.
References:
National Governors Association Center for Best Practices & Council of Chief State School Officers. (2010). Common Core State Standards. Washington, DC: Authors.
Rosenbaum, E. & Silver, J. Makey Makey. (2012). Joy Labz, LLC. Retrieved from http://makeymakey.com/
“Individualized Learning” has become a commonly used buzzword in education. But what exactly is “Individualized Learning” and how is it relevant to the day-to-day classroom?
Individualized learning can be described as the process of learning within the classroom that allows individual students to progress through classroom material at their own pace and typically through their own methods. Often times, this means students are self-directed and have different means of accomplishing learning goals based on individual abilities, preferences and learning needs. This does not mean that standards or curriculum are different for each student. Instead, individualized learning simply takes a student’s individual learning style and needs into account when planning activities necessary for the student to learn the required/state-mandated material in a way that best suites them as an individual and unique learner.
To better understand the buzzword, I created this remix of “individualized learning” with a variant audience in mind. My intentions are that people of all different walks of life (whether teachers or not) can understand the meaning of individualized learning through my one-minute remix. Because my audience is not simply aimed at teachers or teacher-candidates, I thought it best to incorporate both video of students interacting in individualized learning while an experienced adult audibly explains the process, as well as, video that explains the concept through appropriate written text and engaging, but subtle musical accompaniment.
To begin my process, I searched for a main video to use as my inspiration of the buzzword, “individualized learning”. I chose to use the “Personalized Learning” video (reference found below) as the outline for my remix project. It seemed to me that parts of this video accurately described individualized learning while other parts did not. So, to begin my remix video, I found a video of a woman relaying the definition of individualized while visually displaying the definition in text. After the definition portion, the remix continues with subsequent contrasting examples of a traditional classroom (which most viewers are likely to be familiar with) vs. a classroom incorporating individualized learning. Because I wanted my viewers to see an individualized learning classroom in action, I chose to incorporate two portions of an Edutopia video. In between the two portions, my original “Personalized Learning” video displays examples of the type of learning and activities learners are to experience when participating individualized learning. While these examples are displayed, a textbox appears to the Twitter hashtag “#individualizedlearning” encouraging viewers to engage in further learning and research of the buzzword. At the end of the video, I also incorporate two web addresses for viewers to read more on the topic. Although my original “Personal Learning” video includes audio, I found the music to be too-fast paced and not conducive to reading text and absorbing information. For that reason, I muted the original audio and added “Hover II” by Andrew Bird as the background audio for my remix.


